
The application examples in this repository are FreeRTOS based applications running the open source KNX IoT stack on NXP OpenThread enabled platforms such as NXP FRDM-MCXW71.
The demo applications are light_sensor (simulating a KNX light switched sensor basic application - LSSB from the KNX IoT stack repo) and light_actuator (simulating a KNX switched actuator basic application - LSAB from the KNX IoT stack repo).
Boards: FRDM-MCXW71
Categories: Wireless Connectivity
Peripherals: UART
Toolchains: GCC
Table of Contents
1. Software
The build system is based on the ot-nxp repository build system. Supported development and build environments are:
- Linux OS
- Windows OS using WSL (recommending using Ubuntu 22.04 WSL)
The build system uses cmake, ninja and gcc for ARM. These can be installed using the dedicated environment setup script inside the repository. For more details, please refer to the ot-nxp repository.
Another required tool is git, used to pull the repository code.
Secure Provisioning SDK tool (SPSDK) is required to handle NBU updates. This tool can be installed using Python:
$ pip install spsdk
Note: There might be some dependencies that cause conflicts with already installed Python modules. However, blhost tool is still installed and can be used.
Note on Windows and WSL: Windows Subsystem for Linux doesn't map the connected USB devices automatically. As workaround, user needs to use the WSL console for the application build and the Windows command prompt/Power Shell to work with blhost and Jlink that write the required binaries to the boards.
For debugging purpose, MCUXpresso IDE needs to be installed.
MCUXpresso SDK 2.16.100 for FRDM-MCXW71 is required and can be downloaded as zip file from the MCUXpresso SDK page.
2. Hardware
- Personal computer
- USB Type C cable
A minimum of two boards are required to exercise the demo applications.
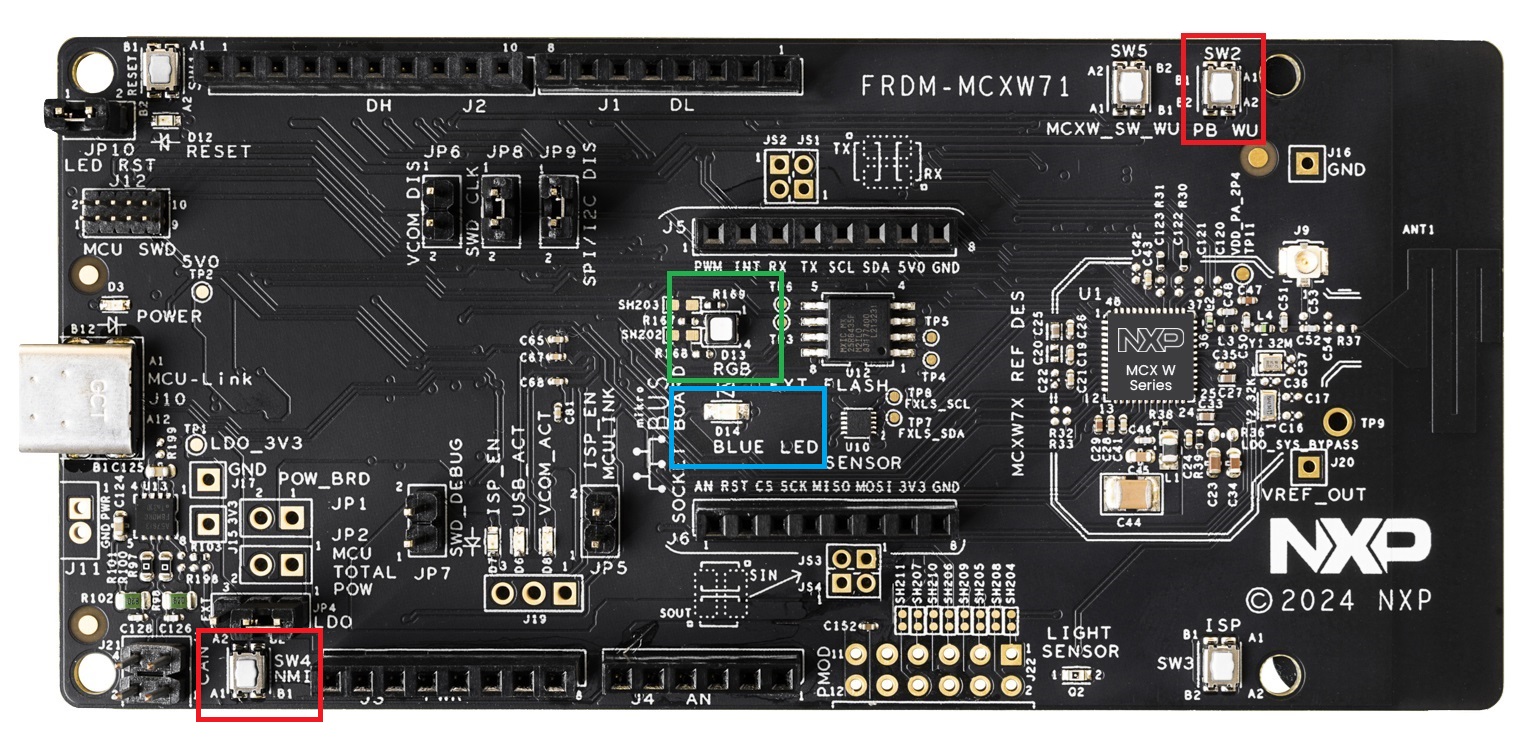
Device UI
The state feedback on the light_actuator board is provided through LED effects:
| widget | effect | state | description |
|---|---|---|---|
| RGB LED | Green on/off | commissioned to Thread network and KNX application configured | RGB LED will toggle the Green light on/off whenever the KNX CoAP message with /p/o_1_1 uri path is received |
| Monochrome LED | Blue on/off | commissioned to Thread network and KNX application configured | Monochrome LED will toggle the Blue light on/off whenever the KNX CoAP message with /p/o_1_2 uri path is received |
The user actions on the light_sensor board are summarized below:
| button | action | state | output |
|---|---|---|---|
| SW2 | short press | commissioned to Thread network and KNX application configured | The device will send out a multicast KNX message over Thread, using CoAP and /p/o_1_1 uri path |
| SW4 | short press | commissioned to Thread network and KNX application configured | The device will send out a multicast KNX message over Thread, using CoAP and /p/o_1_2 uri path |
3. Setup
3.1 Step 1 - Cloning and setting up the build environment
Clone the repository inside your workspace:
git clone https://github.com/nxp-appcodehub/dm-knx-iot-examples-on-nxp-mcxw71.git
An environment setup script is available in the root of the repository. The script's possible parameters can be listed by issuing in the CLI the ./environment_setup.sh command:
$ ./environment_setup.sh
This is a setup script to set the NXP port of KNX IoT OpenThread examples environment.
Usage: ./environment_setup.sh clean|setup_repos|setup_tools|apply_ot_patch
User can use the script to either set up the subrepositories, set up the build environment tools and SDKs or to clean the repositories.
- Example of output for command to setting up the repositories:
$  ./environment_setup.sh setup_repos
This is a setup script to set the NXP port of KNX IoT OpenThread examples environment.
Setting up the repositories.
The script will update all repositories (ot-nxp and NXP SDK).
The setup will take several minutes to complete.
Setting up submodules.
Submodule 'KNX-IOT-STACK' (https://github.com/KNX-IOT/KNX-IOT-STACK.git) registered for path 'KNX-IOT-STACK'
Submodule 'ot-nxp' (https://github.com/NXP/ot-nxp.git) registered for path 'ot-nxp'
Cloning into '/home/user/knx_iot_nxp_repo/KNX-IOT-STACK'...
Cloning into '/home/user/knx_iot_nxp_repo/ot-nxp'...
Submodule path 'KNX-IOT-STACK': checked out '270890a6cfab8ab0ff92cd155cc2be11ff36b4bb'
Submodule path 'ot-nxp': checked out 'dfbe12280af4a87cb9ae0c0c1d90d71de3372d82'
Submodule 'deps/gtest' (https://github.com/google/googletest.git) registered for path 'KNX-IOT-STACK/deps/gtest'
Submodule 'deps/mbedtls' (https://github.com/ARMmbed/mbedtls.git) registered for path 'KNX-IOT-STACK/deps/mbedtls'
Submodule 'deps/tinycbor' (https://github.com/intel/tinycbor.git) registered for path 'KNX-IOT-STACK/deps/tinycbor'
Cloning into '/home/user/knx_iot_nxp_repo/KNX-IOT-STACK/deps/gtest'...
Cloning into '/home/user/knx_iot_nxp_repo/KNX-IOT-STACK/deps/mbedtls'...
Cloning into '/home/user/knx_iot_nxp_repo/KNX-IOT-STACK/deps/tinycbor'...
Submodule path 'KNX-IOT-STACK/deps/gtest': checked out 'c99458533a9b4c743ed51537e25989ea55944908'
Submodule path 'KNX-IOT-STACK/deps/mbedtls': checked out 'd81c11b8ab61fd5b2da8133aa73c5fe33a0633eb'
Submodule path 'KNX-IOT-STACK/deps/tinycbor': checked out '70aba6ba51881e5b8d108c105a17ed9cdee6bc30'
Submodule path 'ot-nxp': checked out 'ce3f5e4752efb3a4e3ca03887f7c8c0f2d841980'
Submodule 'openthread' (https://github.com/NXP/openthread.git) registered for path 'ot-nxp/openthread'
Cloning into '/home/user/knx_iot_nxp_repo/ot-nxp/openthread'...
Submodule path 'ot-nxp/openthread': checked out '4cc1ffd17439db6e0b97b010ad00043d7509f246'
Setting up submodules done.
Patching ot-nxp repo.
ot-nxp repo has been patched!
Pulling NXP SDK.
=== Initializing from existing manifest repository manifest
--- Creating /home/user/knx_iot_nxp_repo/ot-nxp/third_party/github_sdk/.west and local configuration file
=== Initialized. Now run "west update" inside /home/user/knx_iot_nxp_repo/ot-nxp/third_party/github_sdk.
=== updating sdk-release (core):
--- sdk-release: initializing
Initialized empty Git repository in /home/user/knx_iot_nxp_repo/ot-nxp/third_party/github_sdk/core/.git/
--- sdk-release: fetching, need revision MCUX_2.16.100
...
- Example of output for command to clean the repositories (setting up the repositories before is required):
$ ./environment_setup.sh clean
This is a setup script to set the NXP port of KNX IoT OpenThread examples environment.
Cleaning the environment.
Resetting ot-nxp repository.
HEAD is now at ce3f5e4 [common] Enable Dns over TCP feature for Thread 1.4
Cleaning NXP SDK.
=== running "git reset --hard && git clean -xdf" in sdk-release (core):
...
- Example of output for command to setting up the build toolchain:
$ ./environment_setup.sh setup_tools
This is a setup script to set the NXP port of KNX IoT OpenThread examples environment.
Setting up the toolchain.
The script will update the toolchain.
The setup will take several minutes to complete.
Setting up ot-nxp toolchain environment.
+ main
++ dirname ./script/bootstrap
...
Note: On Windows WSL,
pip install <package>commands can returnerror: externally-managed-environment. This can be fixed by running thepip installcommand with--break-system-packagesadded as argument at the end of the command. For example,pip install west --break-system-packages.
- Certain changes to the ot-nxp repository are required. These changes will be integrated in next releases. This is why for this demo, there is a patch required to be applied on the ot-nxp repository. Example of output for command to patch ot-nxp repo:
$ ./environment_setup.sh apply_ot_patch
This is a setup script to set the NXP port of KNX IoT OpenThread examples environment.
Applying ot-nxp repo patch.
ot-nxp repo has been patched!
3.2 Step 2 - Building the examples
The build scripts are found in the script folder. To build all available KNX IoT applications for an NXP platform such as MCXW71, user needs to run the following command from the root of the repository:
$ ./script/build_mcxw71_knx
To build just one particular application, such as light_sensor or light_actuator, user needs to add to the previous command the desired application through the keywords knx_light_sensor and knx_light_actuator.
$ ./script/build_mcxw71_knx knx_light_sensor
The output of the build is found in the build_mcxw71 folder, having two separate subfolders, build_mcxw71/knx_light_sensor and build_mcxw71/knx_light_actuator. The elf and binary files for the build are found in the bin subfolder for each application.
3.3 Step 3 - Flashing the FRDM-MCXW71 board
Two images must be written to the board: one for the host (CM33) and one for the NBU (CM3).
Flashing the NBU image
NBU image should be written only when a new NXP SDK is released. SPSDK needs to be installed before this step.
It is necessary to work with the matching `NBU` image for the SDK version of
the application you are working with. This means that when you download your
SDK, prior to loading any wireless SDK example, update your `NBU` image with
the SDK provided binaries. For `FRDM` users, please write the following
binary:

`middleware/wireless/ieee-802.15.4/bin/mcxw71/mcxw71_nbu_ble_15_4_dyn_matter_<nbu_version>.sb3`

Please note that `<nbu_version>` may vary depending on the SDK version. The tested NBU binary from SDK 2.16.100 is version `1_0_17_2`.

1. Before writing the image, please make sure that MCXW71 is in `ISP` mode by keeping the `SW3` button (also named `ISP`) pressed while connecting the MCXW71 board to an USB port (unplug the board if already connected to an USB port).

2. Once the device is connected, you may find the assigned port by running:

    ```
    nxpdevscan
    ```

3. Run the `blhost` command to write the `sb3` file:

    ```
    blhost -p <assigned_port> receive-sb-file <path_to_SDK>/middleware/wireless/ieee-802.15.4/bin/mcxw71/mcxw71_nbu_ble_15_4_dyn_matter_<nbu_version>.sb3
    ```
    An example `<path_to_SDK>` is `/home/user/knx_iot_nxp_repo/ot-nxp/third_party/github_sdk`.
Flashing the host image
Host image is the one found under build_mcxw71/knx_light_actuator/bin or build_mcxw71/knx_light_actuator/bin. It should be written after each build process.
If debugging is needed then jump directly to the Debugging section. Otherwise, if only flashing is needed then JLink can be used:
- Plug
MCXW71to the USB port (no need to keep theSW3button pressed while doing this, e.g. ISP mode is not needed for host flashing) -
Connect JLink to the device:
JLinkExe -device MCXW71 -if SWD -speed 4000 -autoconnect 1
-
Run the following commands:
reset
halt
loadfile light-actuator-mcxw71.srec
reset
go
quit
3.4 Step 4 - Debugging
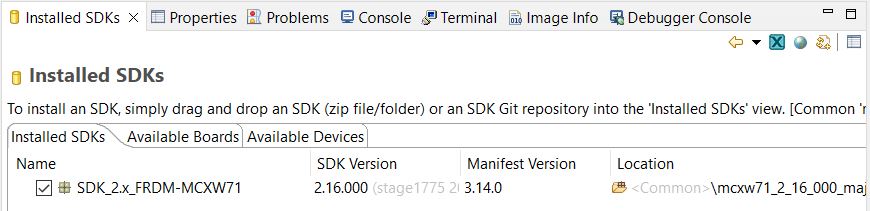
One option for debugging is using MCUXpresso IDE.
- Drag-and-drop the zip file containing the NXP SDK for FRDM-MCXW71 in the "Installed SDKs" tab:
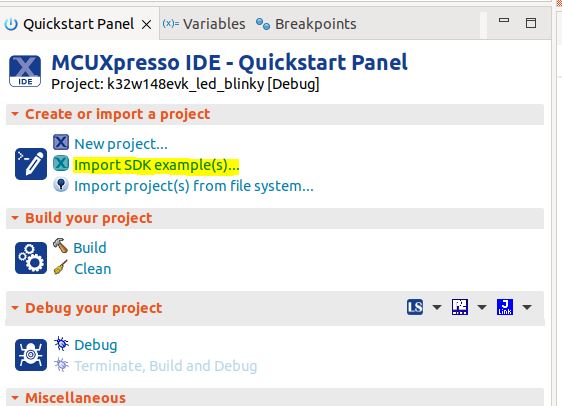
- Import any demo application from the installed SDK:
Import SDK example(s).. -> choose a demo app (demo_apps -> hello_world) -> Finish
- Flash the previously imported demo application on the board:
Right click on the application (from Project Explorer) -> Debug as -> JLink/CMSIS-DAP
After this step, a debug configuration specific for the MCXW71 board was created. This debug configuration will be used later on for debugging the application resulted after ot-nxp compilation.
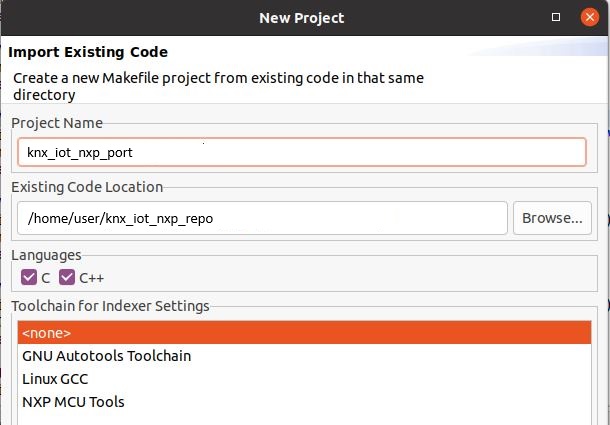
- Import KNX IoT NXP port repo in MCUXpresso IDE as Makefile Project. Use none as Toolchain for Indexer Settings:
File -> Import -> C/C++ -> Existing Code as Makefile Project
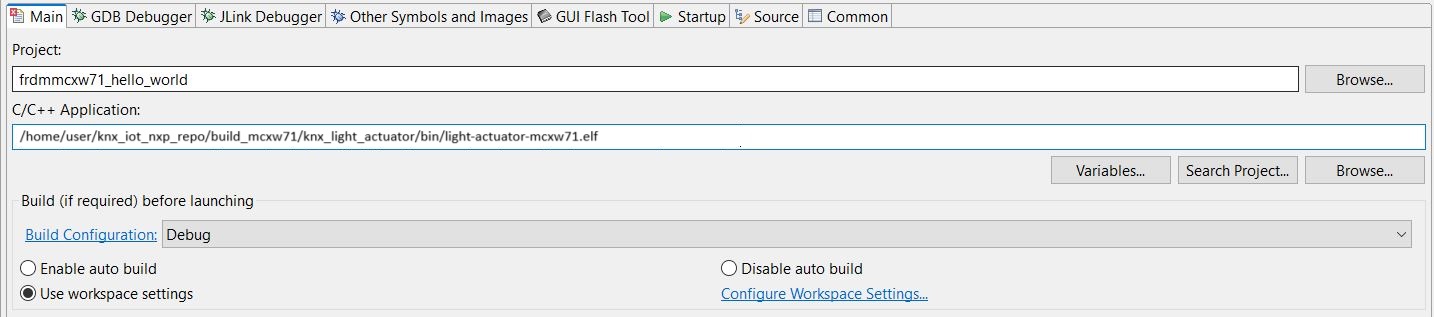
- Replace the path of the existing demo application with the path of the
MCXW71application:
Run -> Debug Configurations... -> C/C++ Application
3.5 Step 5 - Running the KNX demos
Please see:
For details about the KNX shell, see the KNX shell documentation.
4. Support
- Reach out to NXP Wireless Community page for more support - NXP Wireless Community
- Latest KNX IoT Point API Stack development - KNX IoT Point API
Project Metadata
Questions regarding the content/correctness of this example can be entered as Issues within this GitHub repository.
Warning: For more general technical questions regarding NXP Microcontrollers and the difference in expected functionality, enter your questions on the NXP Community Forum
![]()
![]()
![]()
![]()
7. Release Notes
| Version | Description / Update | Date |
|---|---|---|
| 1.0 | Initial release on Application Code Hub | January 31st 2025 |
| 1.1 | KNX IoT stack reference, application and readme | April 8st 2025 |
Licensing
If applicable - note software licensing here with links to licenses, otherwise remove this section
Origin
if applicable - note components your application uses regarding to license terms - with authors / licenses / links to licenses, otherwise remove this section