
In this Sidebar container, you can create, delete or choose between different workspaces. A workspace is a collection of User Interface settings defining the look and feel of ETS.
With an own workspace, each project designer will only see the information on his screen that he needs for his work. Any unnecessary data is not displayed. The various views (e.g. building structure, topology, group addresses) as well as their structure and lists are arranged according to the personal needs. The same project can look completely different when using different workspaces. A project designer needs different information compared to someone merely doing commissioning. The concept of workspaces takes these differences into account.
A workspace can have the following properties:
Properties
| Number | Number of open windows (1,2, ...) and which |
| Order | The Group Addresses window is on top and the Topology window is below it ... |
| Content | Of the windows, for example, of group addresses, topology, bus monitoring or group monitoring as well as of the sidebar |
| Position | Floating/docked |
| Orientation | Horizontally/vertically split |
| Width/Height | Of windows within the ETS main window, in the List View and the Tree View |
| Columns | Width and column selection (also for the monitor window) |
| Bars |
|
Default
After installation, ETS only offers the Default workspace.
- It cannot be deleted, but it can be changed.
- You can always restore the original settings by resetting the User Settings.
- Newly created projects or those opened for the first time on this PC use this workspace by default.
|
|
As soon as you change settings that can be saved in a workspace, the name will be displayed in italics. Use the icon to save the changes in the workspace. |
|
|
The active workspace is marked in front of the name (see notes for exception). |
|
|
Save current settings in a new workspace. |
|
|
Delete selected workspace (or DEL key). There is no automatic switch to another available workspace after this. |
|
Rename the selected workspace (or F2). |


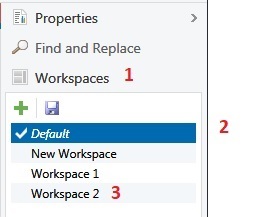
Create an own workspace
As soon as the desired placement of screen elements, open in the tool area (normally located on the right side) the heading “workspace” (1). There you click on the “plus” symbol (2) in the header and then assign a useful name (3) to this workspace. For adjustment of columns, see here.
Select and activate a workspace
By double-clicking on one of the workspaces in the workspace container list.
- The active workspace is linked only to the currently active project, not to other projects open in ETS.
- The name of the active workspace is displayed in the Status Bar (also in the case of the “Last-used workspace”, see notes).
Notes
- Workspaces are sorted alphabetically by name, first by numbers then by letters.
- The button configuration in the main tool bar is not a part of a workspace.
- A workspace is not limited to one project; any type of workspace (or the same one) can be activated in any project.
- Available or installed ETS Apps can be defined as an component of a workspace.
- When closing ETS or the last open project, the current settings (including those for any custom, self-defined active workspaces) are saved to the internal “last-used workspace“ (in order to avoid errors, e.g. when a project is opened and the active workspace was previously deleted).
- The following priority rules apply when ETS is started and a project is opened automatically:
- Last-Used Workspace
- Default Workspace (see above)